YouZum

Committee

AI, Committee, Notizie, Uncategorized

How to Build Interactive Geospatial Dashboards Using Folium with Heatmaps, Choropleths, Time Animation, Marker Clustering, and Advanced Interactive Plugins

In this Folium tutorial, we build a complete set of interactive maps that run in Colab or any local Python setup. We explore multiple basemap styles, design rich markers with HTML popups, and visualize spatial density using heatmaps. We also create region-level choropleth maps from GeoJSON, scale to thousands of points using marker clustering, and animate time-based movement with a timestamped layer. Finally, we combine real-world USGS earthquake data with layered magnitude buckets, density heatmaps, legends, and fullscreen controls to produce a practical, dashboard-like global monitor. Copy CodeCopiedUse a different Browser import folium from folium import plugins from folium.plugins import HeatMap, MarkerCluster, TimestampedGeoJson, MiniMap, Draw, Fullscreen import pandas as pd import numpy as np import json import requests from datetime import datetime, timedelta import branca.colormap as cm print(f”Folium version: {folium.__version__}”) print(“All imports successful!n”) We import all required libraries, such as Folium, Pandas, NumPy, Requests, and Folium plugins to prepare our geospatial environment. We initialize the mapping workflow by confirming the Folium version and ensuring that all dependencies load successfully. This setup establishes the technical foundation for building interactive maps, processing data, and integrating external geospatial sources. Copy CodeCopiedUse a different Browser def create_multi_tile_map(): “””Create a map with multiple tile layers””” m = folium.Map( location=[40.7128, -74.0060], zoom_start=12, tiles=’OpenStreetMap’ ) folium.TileLayer(‘cartodbpositron’, name=’CartoDB Positron’).add_to(m) folium.TileLayer(‘cartodbdark_matter’, name=’CartoDB Dark Matter’).add_to(m) folium.TileLayer( tiles=’https://tiles.stadiamaps.com/tiles/stamen_terrain/{z}/{x}/{y}.png’, attr=’Map tiles by Stamen Design, under CC BY 3.0. Data by OpenStreetMap, under ODbL’, name=’Terrain’ ).add_to(m) folium.TileLayer( tiles=’https://tiles.stadiamaps.com/tiles/stamen_toner/{z}/{x}/{y}.png’, attr=’Map tiles by Stamen Design, under CC BY 3.0. Data by OpenStreetMap, under ODbL’, name=’Toner’ ).add_to(m) folium.TileLayer( tiles=’https://tiles.stadiamaps.com/tiles/stamen_watercolor/{z}/{x}/{y}.jpg’, attr=’Map tiles by Stamen Design, under CC BY 3.0. Data by OpenStreetMap, under ODbL’, name=’Watercolor’ ).add_to(m) folium.LayerControl().add_to(m) return m We create a multi-layer base map and configure multiple tile providers to enable different visual styles. We add terrain, dark mode, toner, and watercolor layers so we can switch perspectives based on the analytical requirements. By including a layer control panel, we can dynamically toggle map styles and explore spatial data more effectively. Copy CodeCopiedUse a different Browser def create_advanced_markers_map(): “””Create map with custom markers and HTML popups””” landmarks = [ {‘name’: ‘Statue of Liberty’, ‘lat’: 40.6892, ‘lon’: -74.0445, ‘type’: ‘monument’, ‘visitors’: 4500000}, {‘name’: ‘Empire State Building’, ‘lat’: 40.7484, ‘lon’: -73.9857, ‘type’: ‘building’, ‘visitors’: 4000000}, {‘name’: ‘Central Park’, ‘lat’: 40.7829, ‘lon’: -73.9654, ‘type’: ‘park’, ‘visitors’: 42000000}, {‘name’: ‘Brooklyn Bridge’, ‘lat’: 40.7061, ‘lon’: -73.9969, ‘type’: ‘bridge’, ‘visitors’: 4000000}, {‘name’: ‘Times Square’, ‘lat’: 40.7580, ‘lon’: -73.9855, ‘type’: ‘plaza’, ‘visitors’: 50000000} ] m = folium.Map(location=[40.7128, -74.0060], zoom_start=12) icon_colors = { ‘monument’: ‘red’, ‘building’: ‘blue’, ‘park’: ‘green’, ‘bridge’: ‘orange’, ‘plaza’: ‘purple’ } icon_symbols = { ‘monument’: ‘star’, ‘building’: ‘home’, ‘park’: ‘tree’, ‘bridge’: ‘road’, ‘plaza’: ‘shopping-cart’ } for landmark in landmarks: html = f””” <div style="”font-family:" arial; width: 200px;”> <h4 style="”color:" {icon_colors[landmark[‘type’]]};”>{landmark[‘name’]}</h4> <hr style="”margin:" 5px 0;”> <p><b>Type:</b> {landmark[‘type’].title()}</p> <p><b>Annual Visitors:</b> {landmark[‘visitors’]:,}</p> <img src="”https://via.placeholder.com/180×100?text={landmark[‘name’].replace(‘" ‘, ‘+’)}” style="”width:" 100%; border-radius: 5px;”> </div> “”” iframe = folium.IFrame(html, width=220, height=250) popup = folium.Popup(iframe, max_width=220) folium.Marker( location=[landmark[‘lat’], landmark[‘lon’]], popup=popup, tooltip=landmark[‘name’], icon=folium.Icon( color=icon_colors[landmark[‘type’]], icon=icon_symbols[landmark[‘type’]], prefix=’fa’ ) ).add_to(m) folium.CircleMarker( location=[40.7128, -74.0060], radius=20, popup=’NYC Center’, color=’#3186cc’, fill=True, fillColor=’#3186cc’, fillOpacity=0.2 ).add_to(m) return m We build a map with advanced markers and rich HTML popups to represent real-world landmarks. We customize marker icons, colors, and symbols by location type to enhance visual clarity and semantic meaning. By embedding structured HTML content inside popups, we present detailed contextual information directly within the interactive map. Copy CodeCopiedUse a different Browser def create_heatmap(): “””Create a heatmap showing data density””” np.random.seed(42) n_incidents = 1000 crime_data = [] hotspots = [ [40.7580, -73.9855], [40.7484, -73.9857], [40.7128, -74.0060], ] for _ in range(n_incidents): hotspot = hotspots[np.random.choice(len(hotspots))] lat = hotspot[0] + np.random.normal(0, 0.02) lon = hotspot[1] + np.random.normal(0, 0.02) intensity = np.random.uniform(0.3, 1.0) crime_data.append([lat, lon, intensity]) m = folium.Map(location=[40.7128, -74.0060], zoom_start=12) HeatMap( crime_data, min_opacity=0.2, max_zoom=18, max_val=1.0, radius=15, blur=25, gradient={ 0.0: ‘blue’, 0.3: ‘lime’, 0.5: ‘yellow’, 0.7: ‘orange’, 1.0: ‘red’ } ).add_to(m) title_html = ”’ <div style="”position:" fixed; top: 10px; left: 50px; width: 300px; height: 60px; background-color: white; border:2px solid grey; z-index:9999; font-size:16px; padding: 10px”> <h4 style="”margin:" 0;”>NYC Crime Density Heatmap</h4> <p style="”margin:" 5px 0 0; font-size: 12px;”>Simulated incident data</p> </div> ”’ m.get_root().html.add_child(folium.Element(title_html)) return m We generate synthetic spatial data and use a heatmap to visualize density patterns across geographic locations. We simulate clustered coordinates and apply gradient-based intensity visualization to reveal spatial concentration trends. By overlaying this density layer on the map, we gain insight into how events distribute across regions. Copy CodeCopiedUse a different Browser def create_choropleth_map(): “””Create a choropleth map showing data across regions””” us_states_url = ‘https://raw.githubusercontent.com/python-visualization/folium/master/examples/data/us-states.json’ try: us_states = requests.get(us_states_url).json() except: print(“Warning: Could not fetch GeoJSON data. Using offline sample.”) return None state_data = { ‘Alabama’: 5.1, ‘Alaska’: 6.3, ‘Arizona’: 4.7, ‘Arkansas’: 3.8, ‘California’: 5.3, ‘Colorado’: 3.9, ‘Connecticut’: 4.3, ‘Delaware’: 4.1, ‘Florida’: 3.6, ‘Georgia’: 4.0, ‘Hawaii’: 2.8, ‘Idaho’: 2.9, ‘Illinois’: 5.0, ‘Indiana’: 3.5, ‘Iowa’: 3.1, ‘Kansas’: 3.3, ‘Kentucky’: 4.3, ‘Louisiana’: 4.6, ‘Maine’: 3.2, ‘Maryland’: 4.0, ‘Massachusetts’: 3.6, ‘Michigan’: 4.3, ‘Minnesota’: 3.2, ‘Mississippi’: 5.2, ‘Missouri’: 3.7, ‘Montana’: 3.5, ‘Nebraska’: 2.9, ‘Nevada’: 4.8, ‘New Hampshire’: 2.7, ‘New Jersey’: 4.2, ‘New Mexico’: 5.0, ‘New York’: 4.5, ‘North Carolina’: 4.0, ‘North Dakota’: 2.6, ‘Ohio’: 4.2, ‘Oklahoma’: 3.4, ‘Oregon’: 4.2, ‘Pennsylvania’: 4.4, ‘Rhode Island’: 4.0, ‘South Carolina’: 3.5, ‘South Dakota’: 2.9, ‘Tennessee’: 3.6, ‘Texas’: 4.0, ‘Utah’: 2.8, ‘Vermont’: 2.8, ‘Virginia’: 3.3, ‘Washington’: 4.6, ‘West Virginia’: 5.1, ‘Wisconsin’: 3.4, ‘Wyoming’: 3.6 } df = pd.DataFrame(list(state_data.items()), columns=[‘State’, ‘Unemployment’]) m = folium.Map(location=[37.8, -96], zoom_start=4) folium.Choropleth( geo_data=us_states, name=’choropleth’, data=df, columns=[‘State’, ‘Unemployment’], key_on=’feature.properties.name’, fill_color=’YlOrRd’, fill_opacity=0.7, line_opacity=0.5, legend_name=’Unemployment Rate (%)’ ).add_to(m) style_function = lambda x: {‘fillColor’: ‘#ffffff’, ‘color’:’#000000′, ‘fillOpacity’: 0.1, ‘weight’: 0.1} highlight_function = lambda x: {‘fillColor’: ‘#000000’, ‘color’:’#000000′, ‘fillOpacity’: 0.50, ‘weight’: 0.1} NIL = folium.features.GeoJson( us_states, style_function=style_function, control=False, highlight_function=highlight_function, tooltip=folium.features.GeoJsonTooltip( fields=[‘name’], aliases=[‘State:’], style=(“background-color: white; color: #333333; font-family: arial; font-size: 12px; padding: 10px;”) ) ) m.add_child(NIL) m.keep_in_front(NIL) folium.LayerControl().add_to(m) return m We create a choropleth map by combining GeoJSON boundary data with structured numerical attributes. We map unemployment rates to geographic regions and use color gradients to visually represent statistical differences. By enabling hover interactions and tooltips, we can explore region-specific data directly within the map interface. Copy CodeCopiedUse a different Browser def create_marker_cluster_map(): “””Create a map
How to Build Interactive Geospatial Dashboards Using Folium with Heatmaps, Choropleths, Time Animation, Marker Clustering, and Advanced Interactive Plugins Leggi l'articolo »

AI, Committee, Notizie, Uncategorized

A Complete End-to-End Coding Guide to MLflow Experiment Tracking, Hyperparameter Optimization, Model Evaluation, and Live Model Deployment

In this tutorial, we build a complete, production-grade ML experimentation and deployment workflow using MLflow. We start by launching a dedicated MLflow Tracking Server with a structured backend and artifact store, enabling us to track experiments in a scalable, reproducible manner. We then train multiple machine learning models using a nested hyperparameter sweep while automatically logging parameters, metrics, and model artifacts. We enhance the experiment by logging diagnostic visualizations, evaluating the best model using MLflow’s built-in evaluation framework, and storing detailed evaluation results for future analysis. We also deploy the trained model using MLflow’s native serving capabilities and interact with it via a REST API, demonstrating how MLflow bridges the gap between experimentation and real-world model deployment. Copy CodeCopiedUse a different Browser !pip -q install “mlflow>=3.0.0″ scikit-learn pandas numpy matplotlib requests import os import time import json import shutil import socket import signal import subprocess from pathlib import Path import numpy as np import pandas as pd import matplotlib.pyplot as plt import requests from sklearn.datasets import load_breast_cancer from sklearn.model_selection import train_test_split from sklearn.pipeline import Pipeline from sklearn.preprocessing import StandardScaler from sklearn.linear_model import LogisticRegression from sklearn.metrics import ( roc_auc_score, accuracy_score, precision_score, recall_score, f1_score, confusion_matrix, ConfusionMatrixDisplay, ) import mlflow import mlflow.sklearn from mlflow.models.signature import infer_signature def _is_port_open(host: str, port: int, timeout_s: float = 0.2) -> bool: with socket.socket(socket.AF_INET, socket.SOCK_STREAM) as s: s.settimeout(timeout_s) return s.connect_ex((host, port)) == 0 def _wait_for_http(url: str, timeout_s: int = 30) -> None: t0 = time.time() last_err = None while time.time() – t0 < timeout_s: try: r = requests.get(url, timeout=1) if r.status_code < 500: return except Exception as e: last_err = e time.sleep(0.5) raise RuntimeError(f”Server not ready at {url}. Last error: {last_err}”) def _safe_kill(proc: subprocess.Popen): if proc is None: return try: proc.terminate() try: proc.wait(timeout=5) except subprocess.TimeoutExpired: proc.kill() except Exception: pass We install all required dependencies and import the complete MLflow, scikit-learn, and system libraries needed for experiment tracking and deployment. We define utility functions that allow us to check port availability, wait for server readiness, and safely terminate background processes. We establish the foundational infrastructure to ensure our MLflow tracking server and model-serving components operate reliably in the Colab environment. Copy CodeCopiedUse a different Browser BASE_DIR = Path(“/content/mlflow_colab_demo”).resolve() BACKEND_DB = BASE_DIR / “mlflow.db” ARTIFACT_ROOT = BASE_DIR / “mlartifacts” os.makedirs(BASE_DIR, exist_ok=True) os.makedirs(ARTIFACT_ROOT, exist_ok=True) HOST = “127.0.0.1” PORT = 5000 TRACKING_URI = f”http://{HOST}:{PORT}” if _is_port_open(HOST, PORT): for p in range(5001, 5015): if not _is_port_open(HOST, p): PORT = p TRACKING_URI = f”http://{HOST}:{PORT}” break print(“Using TRACKING_URI:”, TRACKING_URI) print(“Backend DB:”, BACKEND_DB) print(“Artifact root:”, ARTIFACT_ROOT) server_cmd = [ “mlflow”, “server”, “–host”, HOST, “–port”, str(PORT), “–backend-store-uri”, f”sqlite:///{BACKEND_DB}”, “–default-artifact-root”, str(ARTIFACT_ROOT), ] mlflow_server = subprocess.Popen( server_cmd, stdout=subprocess.PIPE, stderr=subprocess.STDOUT, text=True, ) _wait_for_http(TRACKING_URI, timeout_s=45) mlflow.set_tracking_uri(TRACKING_URI) print(“MLflow server is up.”) EXPERIMENT_NAME = “colab-advanced-mlflow-sklearn” mlflow.set_experiment(EXPERIMENT_NAME) We configure the MLflow backend storage and artifact directories to create a structured, persistent experiment-tracking environment. We launch the MLflow Tracking Server with a SQLite database and a local artifact store, enabling full experiment logging and management. We connect our notebook to the running MLflow server and initialize a dedicated experiment that will organize all training runs and associated metadata. Copy CodeCopiedUse a different Browser data = load_breast_cancer(as_frame=True) df = data.frame.copy() target_col = “target” X = df.drop(columns=[target_col]) y = df[target_col].astype(int) mlflow.sklearn.autolog( log_input_examples=False, log_model_signatures=False, silent=True ) C_VALUES = [0.01, 0.1, 1.0, 3.0] SOLVERS = [“liblinear”, “lbfgs”] best = {“auc”: -1.0, “run_id”: None, “params”: None} We load the dataset and prepare the training and testing splits required for machine learning experimentation. We enable MLflow autologging, allowing automatic tracking of parameters, metrics, and model artifacts without manual intervention. We define the hyperparameter search space and initialize the structure to identify and store the best-performing model configuration. Copy CodeCopiedUse a different Browser with mlflow.start_run(run_name=”parent_sweep_run”) as parent_run: mlflow.log_param(“dataset”, “sklearn_breast_cancer”) mlflow.log_param(“n_features”, X_train.shape[1]) mlflow.log_param(“n_train”, X_train.shape[0]) mlflow.log_param(“n_test”, X_test.shape[0]) for C in C_VALUES: for solver in SOLVERS: with mlflow.start_run(run_name=f”child_C={C}_solver={solver}”, nested=True) as child_run: pipe = Pipeline([ (“scaler”, StandardScaler()), (“clf”, LogisticRegression( C=C, solver=solver, penalty=”l2″, max_iter=2000, random_state=42 )) ]) pipe.fit(X_train, y_train) proba = pipe.predict_proba(X_test)[:, 1] pred = (proba >= 0.5).astype(int) auc = roc_auc_score(y_test, proba) acc = accuracy_score(y_test, pred) prec = precision_score(y_test, pred, zero_division=0) rec = recall_score(y_test, pred, zero_division=0) f1 = f1_score(y_test, pred, zero_division=0) mlflow.log_metrics({ “test_auc”: float(auc), “test_accuracy”: float(acc), “test_precision”: float(prec), “test_recall”: float(rec), “test_f1″: float(f1), }) cm = confusion_matrix(y_test, pred) disp = ConfusionMatrixDisplay(cm, display_labels=data.target_names) fig, ax = plt.subplots(figsize=(5, 4)) disp.plot(ax=ax, values_format=”d”) ax.set_title(f”Confusion Matrix (C={C}, solver={solver})”) cm_path = BASE_DIR / “confusion_matrix.png” fig.tight_layout() fig.savefig(cm_path, dpi=140) plt.close(fig) mlflow.log_artifact(str(cm_path), artifact_path=”diagnostics”) if auc > best[“auc”]: best.update({ “auc”: float(auc), “run_id”: child_run.info.run_id, “params”: {“C”: C, “solver”: solver} }) mlflow.log_dict(best, “best_run_summary.json”) print(“Best config:”, best) We perform a nested hyperparameter sweep, training multiple models within a structured parent-child run hierarchy. We compute performance metrics and log them alongside diagnostic artifacts, such as confusion matrices, to enable detailed analysis of experiments. We continuously monitor model performance and update our tracking structure to identify the best configuration across all training runs. Copy CodeCopiedUse a different Browser best_C = best[“params”][“C”] best_solver = best[“params”][“solver”] final_pipe = Pipeline([ (“scaler”, StandardScaler()), (“clf”, LogisticRegression( C=best_C, solver=best_solver, penalty=”l2″, max_iter=2000, random_state=42 )) ]) with mlflow.start_run(run_name=”final_model_run”) as final_run: final_pipe.fit(X_train, y_train) proba = final_pipe.predict_proba(X_test)[:, 1] pred = (proba >= 0.5).astype(int) metrics = { “test_auc”: float(roc_auc_score(y_test, proba)), “test_accuracy”: float(accuracy_score(y_test, pred)), “test_precision”: float(precision_score(y_test, pred, zero_division=0)), “test_recall”: float(recall_score(y_test, pred, zero_division=0)), “test_f1”: float(f1_score(y_test, pred, zero_division=0)), } mlflow.log_metrics(metrics) mlflow.log_params({“C”: best_C, “solver”: best_solver, “model”: “LogisticRegression+StandardScaler”}) input_example = X_test.iloc[:5].copy() signature = infer_signature(input_example, final_pipe.predict_proba(input_example)[:, 1]) model_info = mlflow.sklearn.log_model( sk_model=final_pipe, artifact_path=”model”, signature=signature, input_example=input_example, registered_model_name=None, ) print(“Final run_id:”, final_run.info.run_id) print(“Logged model URI:”, model_info.model_uri) eval_df = X_test.copy() eval_df[“label”] = y_test.values eval_result = mlflow.models.evaluate( model=model_info.model_uri, data=eval_df, targets=”label”, model_type=”classifier”, evaluators=”default”, ) eval_summary = { “metrics”: {k: float(v) if isinstance(v, (int, float, np.floating)) else str(v) for k, v in eval_result.metrics.items()}, “artifacts”: {k: str(v) for k, v in eval_result.artifacts.items()}, } mlflow.log_dict(eval_summary, “evaluation/eval_summary.json”) We train the final model using the best hyperparameters identified during the experiment sweep and log it with a proper signature and input example. We evaluate the model using MLflow’s built-in evaluation framework, which generates detailed metrics and evaluation artifacts. We store the evaluation summary within MLflow, ensuring the final model is fully documented, reproducible, and ready for deployment. Copy CodeCopiedUse a different Browser SERVE_PORT = 6000 if _is_port_open(HOST, SERVE_PORT): for p

A Complete End-to-End Coding Guide to MLflow Experiment Tracking, Hyperparameter Optimization, Model Evaluation, and Live Model Deployment Leggi l'articolo »

AI, Committee, Notizie, Uncategorized

Google DeepMind Introduces Unified Latents (UL): A Machine Learning Framework that Jointly Regularizes Latents Using a Diffusion Prior and Decoder

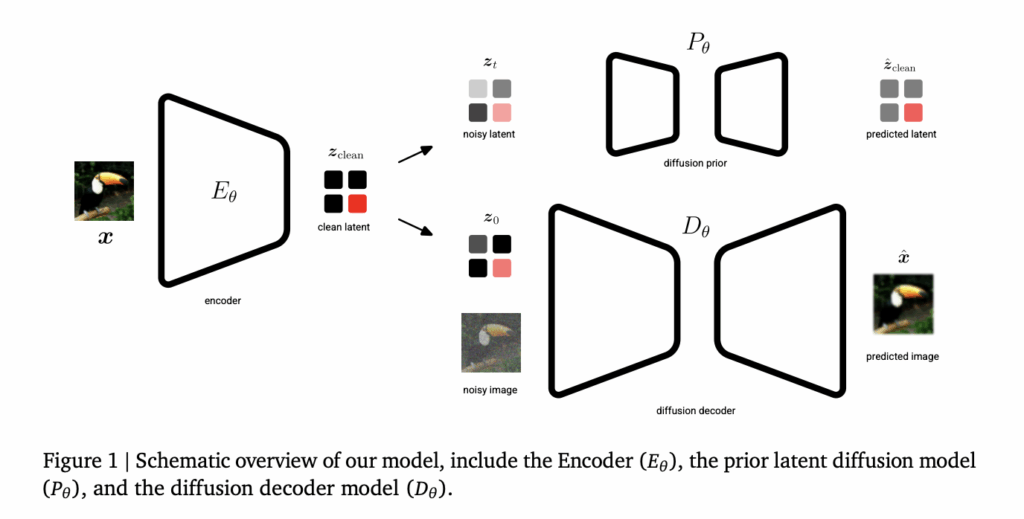
Generative AI’s current trajectory relies heavily on Latent Diffusion Models (LDMs) to manage the computational cost of high-resolution synthesis. By compressing data into a lower-dimensional latent space, models can scale effectively. However, a fundamental trade-off persists: lower information density makes latents easier to learn but sacrifices reconstruction quality, while higher density enables near-perfect reconstruction but demands greater modeling capacity. Google DeepMind researchers have introduced Unified Latents (UL), a framework designed to navigate this trade-off systematically. The framework jointly regularizes latent representations with a diffusion prior and decodes them via a diffusion model. https://arxiv.org/pdf/2602.17270 The Architecture: Three Pillars of Unified Latents The Unified Latents (UL) framework rests on three specific technical components: Fixed Gaussian Noise Encoding: Unlike standard Variational Autoencoders (VAEs) that learn an encoder distribution, UL uses a deterministic encoder E𝝷 that predicts a single latent zclean. This latent is then forward-noised to a final log signal-to-noise ratio (log-SNR) of λ(0)=5. Prior-Alignment: The prior diffusion model is aligned with this minimum noise level. This alignment allows the Kullback-Leibler (KL) term in the Evidence Lower Bound (ELBO) to reduce to a simple weighted Mean Squared Error (MSE) over noise levels. Reweighted Decoder ELBO: The decoder utilizes a sigmoid-weighted loss, which provides an interpretable bound on the latent bitrate while allowing the model to prioritize different noise levels. The Two-Stage Training Process The UL framework is implemented in two distinct stages to optimize both latent learning and generation quality. Stage 1: Joint Latent Learning In the first stage, the encoder, diffusion prior (P𝝷), and diffusion decoder (D𝝷) are trained jointly. The objective is to learn latents that are simultaneously encoded, regularized, and modeled. The encoder’s output noise is linked directly to the prior’s minimum noise level, providing a tight upper bound on the latent bitrate. Stage 2: Base Model Scaling The research team found that a prior trained solely on an ELBO loss in Stage 1 does not produce optimal samples because it weights low-frequency and high-frequency content equally. Consequently, in Stage 2, the encoder and decoder are frozen. A new ‘base model’ is then trained on the latents using a sigmoid weighting, which significantly improves performance. This stage allows for larger model sizes and batch sizes. Technical Performance and SOTA Benchmarks Unified Latents demonstrate high efficiency in the relationship between training compute (FLOPs) and generation quality. Metric Dataset Result Significance FID ImageNet-512 1.4 Outperforms models trained on Stable Diffusion latents for a given compute budget. FVD Kinetics-600 1.3 Sets a new State-of-the-Art (SOTA) for video generation. PSNR ImageNet-512 Up to 30.1 Maintains high reconstruction fidelity even at higher compression levels. On ImageNet-512, UL outperformed previous approaches, including DiT and EDM2 variants, in terms of training cost versus generation FID. In video tasks using Kinetics-600, a small UL model achieved a 1.7 FVD, while the medium variant reached the SOTA 1.3 FVD. https://arxiv.org/pdf/2602.17270 Key Takeaways Integrated Diffusion Framework: UL is a framework that jointly optimizes an encoder, a diffusion prior, and a diffusion decoder, ensuring that latent representations are simultaneously encoded, regularized, and modeled for high-efficiency generation. Fixed-Noise Information Bound: By using a deterministic encoder that adds a fixed amount of Gaussian noise (specifically at a log-SNR of λ(0)=5) and linking it to the prior’s minimum noise level, the model provides a tight, interpretable upper bound on the latent bitrate. Two-Stage Training Strategy: The process involves an initial joint training stage for the autoencoder and prior, followed by a second stage where the encoder and decoder are frozen and a larger ‘base model’ is trained on the latents to maximize sample quality. State-of-the-Art Performance: The framework established a new state-of-the-art (SOTA) Fréchet Video Distance (FVD) of 1.3 on Kinetics-600 and achieved a competitive Fréchet Inception Distance (FID) of 1.4 on ImageNet-512 while requiring fewer training FLOPs than standard latent diffusion baselines. Check out the Paper. Also, feel free to follow us on Twitter and don’t forget to join our 120k+ ML SubReddit and Subscribe to our Newsletter. Wait! are you on telegram? now you can join us on telegram as well. The post Google DeepMind Introduces Unified Latents (UL): A Machine Learning Framework that Jointly Regularizes Latents Using a Diffusion Prior and Decoder appeared first on MarkTechPost.

Google DeepMind Introduces Unified Latents (UL): A Machine Learning Framework that Jointly Regularizes Latents Using a Diffusion Prior and Decoder Leggi l'articolo »

AI, Committee, Notizie, Uncategorized

Alibaba Team Open-Sources CoPaw: A High-Performance Personal Agent Workstation for Developers to Scale Multi-Channel AI Workflows and Memory

As the industry moves from simple Large Language Model (LLM) inference toward autonomous agentic systems, the challenge for devs have shifted. It is no longer just about the model; it is about the environment in which that model operates. A team of researchers from Alibaba released CoPaw, an open-source framework designed to address this by providing a standardized workstation for deploying and managing personal AI agents. CoPaw is built on a technical stack comprising AgentScope, AgentScope Runtime, and ReMe. It functions as a bridge between high-level agent logic and the practical requirements of a personal assistant, such as persistent memory, multi-channel connectivity, and task scheduling. The Architecture: AgentScope and ReMe Integration CoPaw is not a standalone bot but a workstation that orchestrates multiple components to create a cohesive ‘Agentic App.’ The system relies on three primary layers: AgentScope: The underlying framework that handles agent communication and logic. AgentScope Runtime: The execution environment that ensures stable operation and resource management. ReMe (Memory Management): A specialized module that handles both local and cloud-based memory. This allows agents to maintain ‘Long-Term Experience,’ solving the statelessness issue inherent in standard LLM APIs. By leveraging ReMe, CoPaw allows users to control their data privacy while ensuring the agent retains context across different sessions and platforms. This persistent memory is what enables the workstation to adapt to a user’s specific workflows over time. Extensibility via the Skills System A core feature of the CoPaw workstation is its Skill Extension capability. In this framework, a ‘Skill’ is a discrete unit of functionality—essentially a tool that the agent can invoke to interact with the external world. Adding capabilities to CoPaw does not require modifying the core engine. Instead, CoPaw supports a custom skill directory where engineers can drop Python-based functions. These skills follow a standardized specification (influenced by anthropics/skills), allowing the agent to: Perform web scraping (e.g., summarizing Reddit threads or YouTube videos). Interact with local files and desktop environments. Query personal knowledge bases stored within the workstation. Manage calendars and email via natural language. This design allows for the creation of Agentic Apps—complex workflows where the agent uses a combination of built-in skills and scheduled tasks to achieve a goal autonomously. Multi-Channel Connectivity (All-Domain Access) One of the primary technical hurdles in personal AI is deployment across fragmented communication platforms. CoPaw addresses this through its All-Domain Access layer, which standardizes how agents interact with different messaging protocols. Currently, CoPaw supports integration with: Enterprise Platforms: DingTalk and Lark (Feishu). Social/Developer Platforms: Discord, QQ, and iMessage. This multi-channel support means that a developer can initialize a single CoPaw instance and interact with it from any of these endpoints. The workstation handles the translation of messages between the agent’s logic and the specific channel’s API, maintaining a consistent state and memory regardless of where the interaction occurs. Key Takeaways Shift from Model to Workstation: CoPaw moves the focus away from just the Large Language Model (LLM) and toward a structured Workstation architecture. It acts as a middleware layer that orchestrates the AgentScope framework, AgentScope Runtime, and external communication channels to turn raw LLM capabilities into a functional, persistent assistant. Long-Term Memory via ReMe: Unlike standard stateless LLM interactions, CoPaw integrates the ReMe (Memory Management) module. This allows agents to maintain ‘Long-Term Experience’ by storing user preferences and past task data either locally or in the cloud, enabling a personalized evolution of the agent’s behavior over time. Extensible Python-Based ‘Skills’: The framework uses a decoupled Skill Extension system based on the anthropics/skills specification. Developers can extend an agent’s utility by simply adding Python functions to a custom skill directory, allowing the agent to perform specific tasks like web scraping, file manipulation, or API integrations without modifying the core codebase. All-Domain Multi-Channel Access: CoPaw provides a unified interface for cross-platform deployment. A single workstation instance can be connected to enterprise tools (Lark, DingTalk) and social/developer platforms (Discord, QQ, iMessage), allowing the same agent and its memory to be accessed across different environments. Automated Agentic Workflows: By combining Scheduled Tasks with the skills system, CoPaw transitions from reactive chat to proactive automation. Devs can program ‘Agentic Apps’ that perform background operations—such as daily research synthesis or automated repository monitoring—and push results to the user’s preferred communication channel. Check out the Repo here and Website. Also, feel free to follow us on Twitter and don’t forget to join our 120k+ ML SubReddit and Subscribe to our Newsletter. Wait! are you on telegram? now you can join us on telegram as well. The post Alibaba Team Open-Sources CoPaw: A High-Performance Personal Agent Workstation for Developers to Scale Multi-Channel AI Workflows and Memory appeared first on MarkTechPost.

Alibaba Team Open-Sources CoPaw: A High-Performance Personal Agent Workstation for Developers to Scale Multi-Channel AI Workflows and Memory Leggi l'articolo »

AI, Committee, Notizie, Uncategorized

Deepfake Word Detection by Next-token Prediction using Fine-tuned Whisper

arXiv:2602.22658v1 Announce Type: cross Abstract: Deepfake speech utterances can be forged by replacing one or more words in a bona fide utterance with semantically different words synthesized by speech generative models. While a dedicated synthetic word detector could be developed, we investigate a cost-effective method that fine-tunes a pre-trained Whisper model to detect synthetic words while transcribing the input utterance via next-token prediction. We further investigate using partially vocoded utterances as the fine-tuning data, thereby reducing the cost of data collection. Our experiments demonstrate that, on in-domain test data, the fine-tuned Whisper yields low synthetic-word detection error rates and transcription error rates. On out-of-domain test data with synthetic words produced by unseen speech generative models, the fine-tuned Whisper remains on par with a dedicated ResNet-based detection model; however, the overall performance degradation calls for strategies to improve its generalization capability.

Deepfake Word Detection by Next-token Prediction using Fine-tuned Whisper Leggi l'articolo »

AI, Committee, Notizie, Uncategorized

OmniGAIA: Towards Native Omni-Modal AI Agents

arXiv:2602.22897v1 Announce Type: cross Abstract: Human intelligence naturally intertwines omni-modal perception — spanning vision, audio, and language — with complex reasoning and tool usage to interact with the world. However, current multi-modal LLMs are primarily confined to bi-modal interactions (e.g., vision-language), lacking the unified cognitive capabilities required for general AI assistants. To bridge this gap, we introduce OmniGAIA, a comprehensive benchmark designed to evaluate omni-modal agents on tasks necessitating deep reasoning and multi-turn tool execution across video, audio, and image modalities. Constructed via a novel omni-modal event graph approach, OmniGAIA synthesizes complex, multi-hop queries derived from real-world data that require cross-modal reasoning and external tool integration. Furthermore, we propose OmniAtlas, a native omni-modal foundation agent under tool-integrated reasoning paradigm with active omni-modal perception. Trained on trajectories synthesized via a hindsight-guided tree exploration strategy and OmniDPO for fine-grained error correction, OmniAtlas effectively enhances the tool-use capabilities of existing open-source models. This work marks a step towards next-generation native omni-modal AI assistants for real-world scenarios.

OmniGAIA: Towards Native Omni-Modal AI Agents Leggi l'articolo »

AI, Committee, Notizie, Uncategorized

Under the Influence: Quantifying Persuasion and Vigilance in Large Language Models

arXiv:2602.21262v2 Announce Type: replace Abstract: With increasing integration of Large Language Models (LLMs) into areas of high-stakes human decision-making, it is important to understand the risks they introduce as advisors. To be useful advisors, LLMs must sift through large amounts of content, written with both benevolent and malicious intent, and then use this information to convince a user to take a specific action. This involves two social capacities: vigilance (the ability to determine which information to use, and which to discard) and persuasion (synthesizing the available evidence to make a convincing argument). While existing work has investigated these capacities in isolation, there has been little prior investigation of how these capacities may be linked. Here, we use a simple multi-turn puzzle-solving game, Sokoban, to study LLMs’ abilities to persuade and be rationally vigilant towards other LLM agents. We find that puzzle-solving performance, persuasive capability, and vigilance are dissociable capacities in LLMs. Performing well on the game does not automatically mean a model can detect when it is being misled, even if the possibility of deception is explicitly mentioned. However, LLMs do consistently modulate their token use, using fewer tokens to reason when advice is benevolent and more when it is malicious, even if they are still persuaded to take actions leading them to failure. To our knowledge, our work presents the first investigation of the relationship between persuasion, vigilance, and task performance in LLMs, and suggests that monitoring all three independently will be critical for future work in AI safety.

Under the Influence: Quantifying Persuasion and Vigilance in Large Language Models Leggi l'articolo »

AI, Committee, Notizie, Uncategorized

Tokenization, Fusion and Decoupling: Bridging the Granularity Mismatch Between Large Language Models and Knowledge Graphs

arXiv:2602.22698v1 Announce Type: new Abstract: Leveraging Large Language Models (LLMs) for Knowledge Graph Completion (KGC) is promising but hindered by a fundamental granularity mismatch. LLMs operate on fragmented token sequences, whereas entities are the fundamental units in knowledge graphs (KGs) scenarios. Existing approaches typically constrain predictions to limited candidate sets or align entities with the LLM’s vocabulary by pooling multiple tokens or decomposing entities into fixed-length token sequences, which fail to capture both the semantic meaning of the text and the structural integrity of the graph. To address this, we propose KGT, a novel framework that uses dedicated entity tokens to enable efficient, full-space prediction. Specifically, we first introduce specialized tokenization to construct feature representations at the level of dedicated entity tokens. We then fuse pre-trained structural and textual features into these unified embeddings via a relation-guided gating mechanism, avoiding training from scratch. Finally, we implement decoupled prediction by leveraging independent heads to separate and combine semantic and structural reasoning. Experimental results show that KGT consistently outperforms state-of-the-art methods across multiple benchmarks.

Tokenization, Fusion and Decoupling: Bridging the Granularity Mismatch Between Large Language Models and Knowledge Graphs Leggi l'articolo »

AI, Committee, Notizie, Uncategorized

Make It Hard to Hear, Easy to Learn: Long-Form Bengali ASR and Speaker Diarization via Extreme Augmentation and Perfect Alignment

arXiv:2602.23070v1 Announce Type: cross Abstract: Although Automatic Speech Recognition (ASR) in Bengali has seen significant progress, processing long-duration audio and performing robust speaker diarization remain critical research gaps. To address the severe scarcity of joint ASR and diarization resources for this language, we introduce Lipi-Ghor-882, a comprehensive 882-hour multi-speaker Bengali dataset. In this paper, detailing our submission to the DL Sprint 4.0 competition, we systematically evaluate various architectures and approaches for long-form Bengali speech. For ASR, we demonstrate that raw data scaling is ineffective; instead, targeted fine-tuning utilizing perfectly aligned annotations paired with synthetic acoustic degradation (noise and reverberation) emerges as the singular most effective approach. Conversely, for speaker diarization, we observed that global open-source state-of-the-art models (such as Diarizen) performed surprisingly poorly on this complex dataset. Extensive model retraining yielded negligible improvements; instead, strategic, heuristic post-processing of baseline model outputs proved to be the primary driver for increasing accuracy. Ultimately, this work outlines a highly optimized dual pipeline achieving a $sim$0.019 Real-Time Factor (RTF), establishing a practical, empirically backed benchmark for low-resource, long-form speech processing.

Make It Hard to Hear, Easy to Learn: Long-Form Bengali ASR and Speaker Diarization via Extreme Augmentation and Perfect Alignment Leggi l'articolo »

AI, Committee, Notizie, Uncategorized

SmartChunk Retrieval: Query-Aware Chunk Compression with Planning for Efficient Document RAG

arXiv:2602.22225v1 Announce Type: cross Abstract: Retrieval-augmented generation (RAG) has strong potential for producing accurate and factual outputs by combining language models (LMs) with evidence retrieved from large text corpora. However, current pipelines are limited by static chunking and flat retrieval: documents are split into short, predetermined, fixed-size chunks, embeddings are retrieved uniformly, and generation relies on whatever chunks are returned. This design brings challenges, as retrieval quality is highly sensitive to chunk size, often introduces noise from irrelevant or misleading chunks, and scales poorly to large corpora. We present SmartChunk retrieval, a query-adaptive framework for efficient and robust long-document question answering (QA). SmartChunk uses (i) a planner that predicts the optimal chunk abstraction level for each query, and (ii) a lightweight compression module that produces high-level chunk embeddings without repeated summarization. By adapting retrieval granularity on the fly, SmartChunk balances accuracy with efficiency and avoids the drawbacks of fixed strategies. Notably, our planner can reason about chunk abstractions through a novel reinforcement learning scheme, STITCH, which boosts accuracy and generalization. To reflect real-world applications, where users face diverse document types and query styles, we evaluate SmartChunk on five QA benchmarks plus one out-of-domain dataset. Across these evaluations, SmartChunk outperforms state-of-the-art RAG baselines, while reducing cost. Further analysis demonstrates strong scalability with larger corpora and consistent gains on out-of-domain datasets, highlighting its effectiveness as a general framework for adaptive retrieval.

SmartChunk Retrieval: Query-Aware Chunk Compression with Planning for Efficient Document RAG Leggi l'articolo »

We use cookies to improve your experience and performance on our website. You can learn more at Politica sulla privacy and manage your privacy settings by clicking Settings.

Privacy Preferences

You can choose your cookie settings by turning on/off each type of cookie as you wish, except for essential cookies.

Allow All
Manage Consent Preferences
  • Always Active

Save
it_IT