YouZum

Committee

AI, Committee, Actualités, Uncategorized

Structure-Aware Chunking for Tabular Data in Retrieval-Augmented Generation

arXiv:2605.00318v1 Announce Type: new Abstract: Tabular documents such as CSV and Excel files are widely used in enterprise data pipelines, yet existing chunking strategies for retrieval-augmented generation (RAG) are primarily designed for unstructured text and do not account for tabular structure. We propose a structure-aware tabular chunking (STC) framework that operates on row-level units by constructing a hierarchical Row Tree representation, where each row is encoded as a key-value block. STC performs token-constrained splitting aligned with structural boundaries and applies overlap-free greedy merging to produce dense, non-overlapping chunks. This design preserves semantic relationships between fields within a row while improving token utilization and reducing fragmentation. Across evaluations on the MAUD dataset, STC reduces chunk count by up to 40% and 56% compared to standard recursive and key-value based baselines, respectively, while improving token utilization and processing efficiency. In retrieval benchmarks, STC improves MRR from 0.3576 to 0.5945 in a hybrid setting and increases Recall@1 from 0.366 to 0.754 in BM25-only retrieval. These results demonstrate that preserving structure during chunking improves retrieval performance, highlighting the importance of structure-aware chunking for RAG over tabular data.

Structure-Aware Chunking for Tabular Data in Retrieval-Augmented Generation Lire l’article »

AI, Committee, Actualités, Uncategorized

What Don’t You Understand? Using Large Language Models to Identify and Characterize Student Misconceptions About Challenging Topics

arXiv:2605.00294v1 Announce Type: new Abstract: This study presents a systematic approach to identifying and characterizing student misconceptions in online learning environments through a novel combination of quantitative performance analysis and large language model (LLM) assessment. We analyzed data from 9 course periods across 5 online biomedical science courses, encompassing 3,802 medical student enrollments. Using data from 40-50 topic-focused quizzes per course, we developed a two-stage methodology. First, we identified challenging central topics using quiz-level performance metrics. Second, we employed LLMs to characterize the underlying misconceptions in these high-priority areas. By examining student performance on first attempts across primarily multiple-choice questions (MCQs), we identified consistently challenging topics that were also central to course objectives. We then leveraged recent advances in generative AI to analyze three distinct data sources in combination: quiz question content, student response patterns, and lecture transcripts. This approach revealed actionable insights about student misconceptions that were not apparent from performance data alone. The quality of the LLM-identified misconceptions was rated as excellent by subject matter experts. We also conducted teacher interviews to assess the perceived utility of our topic identification method. Faculty found that data-driven identification of challenging topics was valuable and corroborated their own classroom observations. This methodology provides a scalable approach to characterizing student difficulties in learning environments where quizzes are used. Our findings demonstrate the potential for targeted and potentially personalized interventions in future course iterations, with clear pathways for measuring intervention effectiveness through follow-up quiz performance.

What Don’t You Understand? Using Large Language Models to Identify and Characterize Student Misconceptions About Challenging Topics Lire l’article »

AI, Committee, Actualités, Uncategorized

Tailoring AI solutions for health care needs

The AI market is full of big promises of grand transformation. Health care is a prime target for those promises, beset as it is by financial pressures, labor shortages, and the growing burden of caring for an aging population. AI developers are targeting functions that vary widely, from curing cancer and performing surgery to streamlining routine administrative tasks. The opportunity is genuine, but execution can be difficult. Numerous software vendors have tried to “fix” health care challenges but failed because they misunderstood the environment. “Health care is very complex,” says Steve Bethke, vice president of the solution developer market for Mayo Clinic Platform, which supports the buildout and deployment of digital solutions for health care companies through data-based insights and expert validation. “Solution developers must have a deep focus on clinical and technical capabilities, and then align their solutions to the relevant business impacts. If they miss any dimension, the solution will not be adopted or drive value.” DOWNLOAD THE REPORT AI applications for health care are proliferating rapidly. The U.S. Food and Drug Administration has approved more than 1,300 AI-enabled medical devices, mostly for interpreting diagnostic images. More than half of these were approved in the past three years, with the earliest dating as far back as 1995. Non-radiological applications carry out tasks as diverse as tracking sleep apnea, analyzing heart rhythms, and planning orthopedic surgeries. AI applications that do not count as medical devices— for example, those that handle scheduling and administrative tasks—are more difficult to track but are also rapidly increasing. AI can help coordinate complex tasks and workflows that are often conventionally managed by whiteboards and sticky notes. Such functions may well outstrip clinical uses in their impact on health systems. A recent survey of technology leaders found that 72% said their top priority for AI was reducing caregiver burden and improving caregiver satisfaction, while over half (53%) cited workflow efficiency and productivity. Any health care-related application can potentially impact patient care, whether directly or indirectly, and AI apps that are poorly designed or inadequately trained and validated can put patients at risk. Providers recognize that risk: In the same survey, 77% said immature AI tools are a significant barrier to adoption. Regulators and lawmakers are also keeping an eye on the risks as development and adoption burgeon, though the U.S. regulatory picture is still in flux, as a 2024 report to Congress on AI in health care observes. To tackle some of the technical challenges, many health care providers are partnering with application developers to build AI solutions. In a recent study, McKinsey found that 61% of health care organizations intend to pursue partnerships with third-party vendors to develop customized generative AI solutions as a primary strategy as opposed to building them in-house or buying off-the-shelf products. But health care-specific AI applications must also be tailored to the nuanced clinical needs of medical providers as well as the complex business and regulatory considerations of the wider sector. This is where developers can benefit from working with a partner with a deep understanding of the health care environment to tailor applications to what providers want and need most. Doing so helps to position AI products for maximum impact and value, avoiding the pitfalls unique to the health care environment. Download the report. This content was produced by Insights, the custom content arm of MIT Technology Review. It was not written by MIT Technology Review’s editorial staff. It was researched, designed, and written by human writers, editors, analysts, and illustrators. This includes the writing of surveys and collection of data for surveys. AI tools that may have been used were limited to secondary production processes that passed thorough human review.

Tailoring AI solutions for health care needs Lire l’article »

AI, Committee, Actualités, Uncategorized

Build a Multi-Agent AI Workflow for Biological Network Modeling, Protein Interactions, Metabolism, and Cell Signaling Simulation

In this tutorial, we build a multi-agent workflow for biological systems modeling and explore how different computational components work together inside one unified systems biology pipeline. We generate synthetic biological data, analyze gene regulatory structure, predict protein-protein interactions, optimize metabolic pathway activity, and simulate a dynamic cell signaling cascade, all within a Colab environment that remains practical and reproducible. We also use an OpenAI model to act as a principal investigator, synthesizing the outputs of all specialized agents into a single expert-style biological interpretation that connects regulation, interaction networks, metabolism, and signaling into a broader scientific story. Copy CodeCopiedUse a different Browser import sys, subprocess, pkgutil def _install_if_missing(packages): missing = [] for p in packages: import_name = p[“import”] if pkgutil.find_loader(import_name) is None: missing.append(p[“pip”]) if missing: print(“Installing:”, “, “.join(missing)) subprocess.check_call([sys.executable, “-m”, “pip”, “install”, “-q”] + missing) _install_if_missing([ {“pip”: “openai”, “import”: “openai”}, {“pip”: “numpy”, “import”: “numpy”}, {“pip”: “pandas”, “import”: “pandas”}, {“pip”: “matplotlib”, “import”: “matplotlib”}, {“pip”: “networkx”, “import”: “networkx”}, {“pip”: “scikit-learn”, “import”: “sklearn”}, ]) import os import json import math import textwrap import random import getpass from dataclasses import dataclass from typing import Dict, List, Tuple, Any import numpy as np import pandas as pd import matplotlib.pyplot as plt import networkx as nx from sklearn.linear_model import LogisticRegression from sklearn.metrics import roc_auc_score, average_precision_score from sklearn.model_selection import train_test_split from sklearn.preprocessing import StandardScaler from openai import OpenAI np.random.seed(42) random.seed(42) OPENAI_API_KEY = None try: from google.colab import userdata OPENAI_API_KEY = userdata.get(“OPENAI_API_KEY”) if OPENAI_API_KEY: print(“Loaded OPENAI_API_KEY from Colab Secrets.”) except Exception: pass if not OPENAI_API_KEY: try: OPENAI_API_KEY = getpass.getpass(“Enter OPENAI_API_KEY (hidden input): “).strip() except Exception: OPENAI_API_KEY = input(“Enter OPENAI_API_KEY: “).strip() os.environ[“OPENAI_API_KEY”] = OPENAI_API_KEY client = OpenAI(api_key=OPENAI_API_KEY) OPENAI_MODEL = “gpt-4o-mini” We prepare the Colab environment and make sure all required libraries are available before the workflow begins. We import the scientific computing, machine learning, graph analysis, plotting, and OpenAI libraries that support the full biological systems pipeline from start to finish. We also securely load the OpenAI API key either from Colab Secrets or hidden input, initialize the client, and define the model so the notebook is ready for later LLM-based synthesis. Copy CodeCopiedUse a different Browser def sigmoid(x): return 1 / (1 + np.exp(-x)) def pretty(title: str, body: str, width: int = 100): print(“n” + “=” * width) print(title) print(“=” * width) print(body) def safe_float(x): try: return float(x) except Exception: return None def generate_gene_regulatory_network(n_genes: int = 14, edge_prob: float = 0.18): genes = [f”G{i+1}” for i in range(n_genes)] W = np.zeros((n_genes, n_genes)) for i in range(n_genes): for j in range(n_genes): if i != j and np.random.rand() < edge_prob: W[i, j] = np.random.uniform(-1.5, 1.5) return genes, W def simulate_gene_expression(W: np.ndarray, n_steps: int = 70, noise: float = 0.10): n = W.shape[0] X = np.zeros((n_steps, n)) X[0] = np.random.uniform(0.2, 0.8, size=n) for t in range(1, n_steps): signal = X[t-1] @ W X[t] = sigmoid(signal + np.random.normal(0, noise, size=n)) return X def generate_protein_features(n_proteins: int = 40, feature_dim: int = 10): proteins = [f”P{i+1}” for i in range(n_proteins)] features = np.random.normal(size=(n_proteins, feature_dim)) families = np.random.randint(0, 5, size=n_proteins) localization = np.random.randint(0, 4, size=n_proteins) return proteins, features, families, localization def generate_ppi_dataset(proteins, features, families, localization): rows = [] n = len(proteins) hidden_w = np.random.normal(size=features.shape[1]) for i in range(n): for j in range(i + 1, n): fi, fj = features[i], features[j] sim = np.dot(fi, fj) / (np.linalg.norm(fi) * np.linalg.norm(fj) + 1e-8) fam_same = 1 if families[i] == families[j] else 0 loc_same = 1 if localization[i] == localization[j] else 0 feat = np.concatenate([ np.abs(fi – fj), fi * fj, [sim, fam_same, loc_same] ]) score = 1.4 * sim + 1.0 * fam_same + 0.8 * loc_same + 0.15 * np.dot((fi + fj) / 2, hidden_w) prob = sigmoid(score) y = 1 if np.random.rand() < prob else 0 rows.append((proteins[i], proteins[j], feat, y)) return rows def generate_metabolic_network(): metabolites = [“Glucose”, “Pyruvate”, “AcetylCoA”, “ATP”, “Biomass”, “Lactate”, “Ethanol”] reactions = [ {“name”: “R1_Glucose_Uptake”, “yield_biomass”: 0.0, “yield_atp”: 0.3, “substrate_cost”: 1.0, “oxygen_need”: 0.0}, {“name”: “R2_Glycolysis”, “yield_biomass”: 0.2, “yield_atp”: 1.6, “substrate_cost”: 0.7, “oxygen_need”: 0.0}, {“name”: “R3_TCA”, “yield_biomass”: 1.0, “yield_atp”: 2.4, “substrate_cost”: 0.8, “oxygen_need”: 1.4}, {“name”: “R4_Fermentation”, “yield_biomass”: 0.1, “yield_atp”: 0.9, “substrate_cost”: 0.4, “oxygen_need”: 0.0}, {“name”: “R5_Ethanol_Path”, “yield_biomass”: 0.15,”yield_atp”: 0.8, “substrate_cost”: 0.5, “oxygen_need”: 0.0}, {“name”: “R6_Biomass_Assembly”,”yield_biomass”: 1.3, “yield_atp”: -0.9,”substrate_cost”: 0.6, “oxygen_need”: 0.2}, ] return metabolites, reactions def simulate_cell_signaling(T=200, dt=0.05, ligand_level=1.2): t = np.arange(0, T * dt, dt) ligand = np.ones_like(t) * ligand_level receptor = np.zeros_like(t) kinase = np.zeros_like(t) tf = np.zeros_like(t) phosphatase = np.zeros_like(t) receptor[0] = 0.05 kinase[0] = 0.02 tf[0] = 0.01 phosphatase[0] = 0.30 for i in range(1, len(t)): dR = 1.6 * ligand[i-1] * (1 – receptor[i-1]) – 0.9 * receptor[i-1] dK = 1.8 * receptor[i-1] * (1 – kinase[i-1]) – 1.1 * phosphatase[i-1] * kinase[i-1] dTF = 1.4 * kinase[i-1] * (1 – tf[i-1]) – 0.55 * tf[i-1] dP = 0.2 + 0.5 * tf[i-1] – 0.4 * phosphatase[i-1] receptor[i] = np.clip(receptor[i-1] + dt * dR, 0, 1) kinase[i] = np.clip(kinase[i-1] + dt * dK, 0, 1) tf[i] = np.clip(tf[i-1] + dt * dTF, 0, 1) phosphatase[i] = np.clip(phosphatase[i-1] + dt * dP, 0, 1.5) return pd.DataFrame({ “time”: t, “ligand”: ligand, “receptor_active”: receptor, “kinase_active”: kinase, “tf_active”: tf, “phosphatase”: phosphatase, }) We define the main helper utilities and all synthetic data generation functions that power the notebook’s biological tasks. We create functions for gene regulatory network construction, gene expression simulation, protein feature generation, protein interaction dataset creation, metabolic network setup, and cell signaling dynamics, which together provide four distinct biological views for analysis. This snippet forms the computational backbone of the tutorial by creating the structured inputs that each specialized agent will later process and interpret. Copy CodeCopiedUse a different Browser @dataclass class AgentResult: name: str summary: Dict[str, Any] class GeneRegulatoryNetworkAgent: def run(self, genes, W, X) -> AgentResult: corr = np.corrcoef(X.T) inferred_edges = [] true_edges = [] n = len(genes) for i in range(n): for j in range(n): if i == j: continue if abs(corr[i, j]) > 0.35: inferred_edges.append((genes[i], genes[j], float(corr[i, j]))) if abs(W[i, j]) > 1e-8: true_edges.append((genes[i], genes[j], float(W[i, j]))) centrality_graph = nx.DiGraph() for gi in genes: centrality_graph.add_node(gi) for i in range(n): for j in range(n): if abs(W[i, j]) >

Build a Multi-Agent AI Workflow for Biological Network Modeling, Protein Interactions, Metabolism, and Cell Signaling Simulation Lire l’article »

AI, Committee, Actualités, Uncategorized

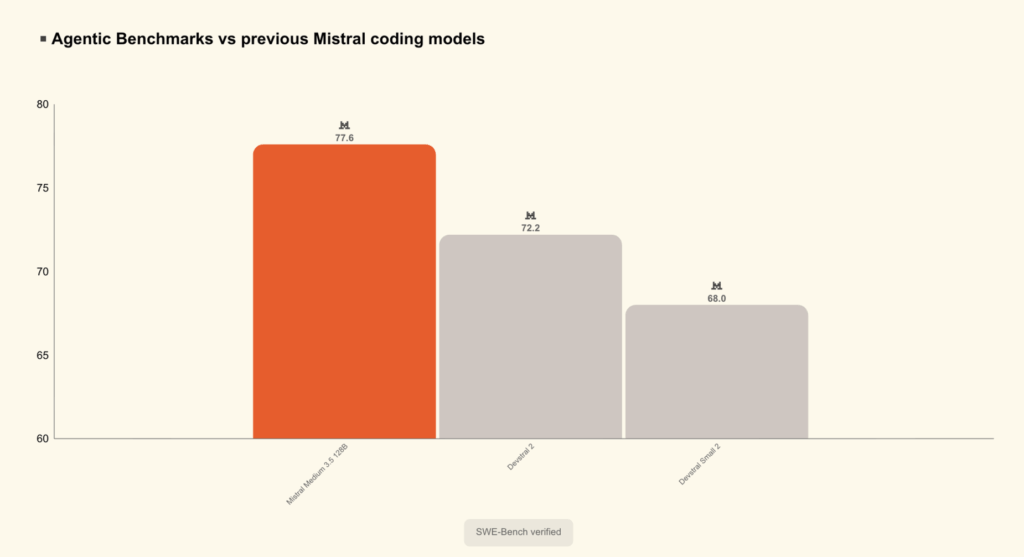
Mistral AI Launches Remote Agents in Vibe and Mistral Medium 3.5 with 77.6% SWE-Bench Verified Score

Mistral AI has been quietly building one of the more practical coding agent ecosystems in the open-source/weights AI space, and they are shipping its most significant infrastructure upgrade yet. Mistral team announced remote agents in Vibe, its coding agent platform, alongside the public preview of Mistral Medium 3.5 — a new 128B dense model that now serves as the default model in both Vibe and Le Chat, Mistral’s consumer assistant. What is Vibe, and Why Does It Matter? If you haven’t used it yet, Mistral Vibe is a coding agent accessible through a CLI (command-line interface) that lets an AI model work through software tasks on your behalf — writing code, refactoring modules, generating tests, investigating CI failures, and more. Think of it as a junior developer that never gets tired and can operate across your codebase. Until now, Vibe sessions ran locally, meaning the agent was tied to your laptop and your terminal. That changes today. Remote Agents: The Agent Runs While You Step Away So, basically now coding sessions can work through long tasks while you’re away. Many can run in parallel, and you stop being the bottleneck on every step the agent takes. This is the key behavioral shift. Instead of babysitting a coding session in your terminal, you kick off a task and let the cloud handle the rest. You can start cloud agents from the Mistral Vibe CLI or from Le Chat. While they run, you can inspect what the agent is doing, with file diffs, tool calls, progress states, and questions surfaced as you go. One particularly useful feature for developers already mid-session: ongoing local CLI sessions can be teleported up to the cloud when you want to leave them running, with session history, task state, and approvals carrying across. So you don’t lose your place — you just move the work off your machine. Each session runs in isolation. Each coding session runs in an isolated sandbox, including broad edits and installs. When the work is done, the agent can open a pull request on GitHub and notify you, so you review the result instead of every keystroke that produced it. It’s also worth understanding the logic behind how Vibe connects to Le Chat. Mistral uses Workflows orchestrated in Mistral Studio to bring Mistral Vibe into Le Chat — originally built for their own in-house coding environment, then for enterprise customers, and now open to everyone. This means the remote coding agent in Le Chat is not a standalone feature — it’s built on top of Mistral’s own orchestration layer, which is useful context if you’re thinking about how to architect similar agentic systems yourself. On the integration side, Vibe plugs into GitHub for code and pull requests, Linear and Jira for issues, Sentry for incidents, and apps like Slack or Teams for reporting. Mistral Medium 3.5: The Model Behind It All None of this would be practically possible without a capable underlying AI model. This new released model is Mistral Medium 3.5, which Mistral team describes as its first flagship merged model. It is a dense 128B model with a 256k context window, handling instruction-following, reasoning, and coding in a single set of weights. For context, a 256k context window means the model can process roughly 200,000 words in a single pass — long enough to reason across an entire large codebase. The model is also multimodal. Mistral team trained the vision encoder from scratch to handle variable image sizes and aspect ratios — a notable architectural choice. Most vision-language models reuse pretrained encoders like CLIP, so building this component from scratch suggests Mistral prioritized flexibility in how the model handles real-world image inputs rather than defaulting to fixed-resolution assumptions. Mistral Medium 3.5 scores 77.6% on SWE-Bench Verified, ahead of Devstral 2 and models like Qwen3.5 397B A17B. SWE-Bench Verified is a standard benchmark that tests whether a model can resolve real-world GitHub issues from popular open-source repositories — it’s one of the most reliable proxies for practical software engineering ability. The model also scores 91.4 on τ³-Telecom and has strong agentic capabilities. https://mistral.ai/news/vibe-remote-agents-mistral-medium-3-5 One particularly interesting design choice: reasoning effort is now configurable per request, so the same model can answer a quick chat reply or work through a complex agentic run. This is important for developers integrating the model via API — you can dial down compute for simple lookups and dial it up for multi-step reasoning tasks, without switching models. The model was built for long-horizon tasks, calling multiple tools reliably, and producing structured output that downstream code can consume. Work Mode in Le Chat: A New Agentic Layer Beyond the coding agent upgrades, Mistral is also shipping Work mode in Le Chat — a new agentic mode for more general, multi-step tasks. Work mode is a powerful new agentic mode for complex tasks in Le Chat, powered by a new harness and Mistral Medium 3.5. The agent becomes the execution backend for the assistant itself, so Le Chat can read and write, use several tools at once, and work through multi-step projects until it completes what you’ve asked. Practically, this means things like cross-tool workflows — catching up across email, messages, and calendar; preparing for a meeting with relevant context pulled from multiple sources; or triaging an inbox and creating Jira issues from team discussions. In Work mode, connectors are on by default rather than chosen manually, which lets the agent reach into documents, mailboxes, calendars, and other systems for the rich context it needs to take correct action. This is a significant usability shift from typical chat assistants, where you manually select tools before each session. Transparency is a built-in feature rather than an afterthought: every action the agent takes is visible — you see each tool call and the thinking rationale. Le Chat will ask for explicit approval — based on your permissions — before proceeding with sensitive tasks like sending a message, writing a document, or modifying data. Key Takeaways Here are the key

Mistral AI Launches Remote Agents in Vibe and Mistral Medium 3.5 with 77.6% SWE-Bench Verified Score Lire l’article »

AI, Committee, Actualités, Uncategorized

What is Tokenization Drift and How to Fix It?

A model can behave perfectly one moment and degrade the next—without any change to your data, pipeline, or logic. The root cause often lies in something far more subtle: how your input is tokenized. Before a model processes text, it converts it into token IDs, and even minor formatting differences—like spacing, line breaks, or punctuation—can produce entirely different token sequences. This phenomenon is known as tokenization drift: when small surface-level changes push your input into a different region of token space, leading to unpredictable shifts in model behavior. The impact goes deeper than just token IDs. During instruction tuning, models learn not only tasks but also the structure in which those tasks are presented—specific separators, prefixes, and formatting patterns. When your prompt deviates from these learned patterns, you are no longer operating within the model’s familiar distribution. The result isn’t confusion—it’s a model doing its best on inputs it was never optimized to handle. In this article, we’ll break this down using the GPT-2 tokenizer to show how small formatting changes affect tokens, and build a simple metric to measure drift across prompts. Then, we’ll implement a lightweight prompt optimization loop to pick formats that keep your inputs consistent and reliable. Setting up the dependencies Copy CodeCopiedUse a different Browser import numpy as np import matplotlib.pyplot as plt import matplotlib.patches as mpatches import seaborn as sns from collections import defaultdict from sklearn.decomposition import PCA In this code block, we are loading the GPT-2 tokenizer — the same Byte-Pair Encoding scheme used by GPT-4, LLaMA, and Mistral. We use GPT-2 specifically because it requires no auth token and demonstrates the space-prefix artifact identically to every modern production tokenizer. Copy CodeCopiedUse a different Browser from transformers import AutoTokenizer tokenizer = AutoTokenizer.from_pretrained(“gpt2”) print(“Tokenizer loaded:”, tokenizer.__class__.__name__) print(“Vocab size:”, tokenizer.vocab_size) Tokenization Artifact Demo We take seven words and test each in two forms—once with a leading space and once without—then encode them using the GPT-2 tokenizer. By setting add_special_tokens=False, we ensure we’re only measuring the token IDs for the words themselves, without any extra padding or special markers. The results are striking. Not a single pair produces the same token ID—every word is treated as completely different depending on whether it has a leading space. Even more interesting, some words without the space don’t map to a single token at all. For example, “classify” becomes two tokens [4871, 1958], while “ classify” is a single token [36509]. This means the model doesn’t just see a different ID—it sees a different sequence length, which shifts how attention is computed for everything that follows. Copy CodeCopiedUse a different Browser pairs = [ (” classify”, “classify”), (” answer”, “answer”), (” positive”, “positive”), (” negative”, “negative”), (” sentiment”, “sentiment”), (” output”, “output”), (” label”, “label”), ] print(“=” * 60) print(f”{‘Token (with space)’:<22} {‘ID’:>6} {‘Token (no space)’:<20} {‘ID’:>6} {‘Same?’:>6}”) print(“=” * 60) for with_space, without_space in pairs: id_ws = tokenizer.encode(with_space, add_special_tokens=False) id_nws = tokenizer.encode(without_space, add_special_tokens=False) match = “✓” if id_ws == id_nws else “✗ DIFFERENT” print(f”{repr(with_space):<22} {str(id_ws):>8} {repr(without_space):<20} {str(id_nws):>8} {match}”) print() print(“Key takeaway: Leading spaces create DIFFERENT token IDs.”) print(“To the model, ‘ classify’ and ‘classify’ are as distinct as ‘apple’ and ‘orange’.”) Visualising the Token ID Shift We plot two charts to make the token ID gap visual. The left chart shows the raw IDs side-by-side — blue for space-prefixed, red for bare — and the right chart plots the absolute distance between each pair. Copy CodeCopiedUse a different Browser words = [p[1] for p in pairs] ids_ws = [tokenizer.encode(” ” + w, add_special_tokens=False)[0] for w in words] ids_nws = [tokenizer.encode(w, add_special_tokens=False)[0] for w in words] delta = [abs(a – b) for a, b in zip(ids_ws, ids_nws)] x = np.arange(len(words)) width = 0.35 fig, axes = plt.subplots(1, 2, figsize=(14, 5)) fig.patch.set_facecolor(“#FAFAF8”) # Left: side-by-side token IDs ax = axes[0] ax.set_facecolor(“#FAFAF8″) bars1 = ax.bar(x – width/2, ids_ws, width, label=’With leading space’, color=”#3B6FE0″, alpha=0.85) bars2 = ax.bar(x + width/2, ids_nws, width, label=’Without leading space’, color=”#E05C3B”, alpha=0.85) ax.set_xticks(x) ax.set_xticklabels(words, rotation=30, ha=”right”, fontsize=9) ax.set_ylabel(“Token ID”, fontsize=10) ax.set_title(“Token IDs: ‘ word’ vs ‘word'”, fontsize=12, fontweight=”bold”, pad=12) ax.legend(fontsize=9) ax.spines[[“top”, “right”]].set_visible(False) ax.grid(axis=”y”, alpha=0.3) for bar in bars1: ax.text(bar.get_x() + bar.get_width()/2, bar.get_height() + 50, str(int(bar.get_height())), ha=”center”, va=”bottom”, fontsize=7, color=”#3B6FE0″) for bar in bars2: ax.text(bar.get_x() + bar.get_width()/2, bar.get_height() + 50, str(int(bar.get_height())), ha=”center”, va=”bottom”, fontsize=7, color=”#E05C3B”) # Right: delta ax2 = axes[1] ax2.set_facecolor(“#FAFAF8”) color_bars = [“#E05C3B” if d > 500 else “#F0A070” if d > 100 else “#A8C4F0” for d in delta] bars3 = ax2.bar(words, delta, color=color_bars, alpha=0.9) ax2.set_ylabel(“Absolute Token ID Distance”, fontsize=10) ax2.set_title(“How Far Apart Are the Token IDs?”, fontsize=12, fontweight=”bold”, pad=12) ax2.set_xticklabels(words, rotation=30, ha=”right”, fontsize=9) ax2.spines[[“top”, “right”]].set_visible(False) ax2.grid(axis=”y”, alpha=0.3) for bar, d in zip(bars3, delta): ax2.text(bar.get_x() + bar.get_width()/2, bar.get_height() + 10, str(d), ha=”center”, va=”bottom”, fontsize=9, fontweight=”bold”) high = mpatches.Patch(color=”#E05C3B”, alpha=0.9, label=”> 500 apart”) med = mpatches.Patch(color=”#F0A070″, alpha=0.9, label=”100-500 apart”) low = mpatches.Patch(color=”#A8C4F0″, alpha=0.9, label=”< 100 apart”) ax2.legend(handles=[high, med, low], fontsize=8) plt.tight_layout(pad=2) plt.suptitle(“Tokenization Artifacts: One Space, Completely Different Token”, fontsize=14, fontweight=”bold”, y=1.02) plt.savefig(“tokenization_artifact.png”, dpi=150, bbox_inches=”tight”, facecolor=”#FAFAF8″) plt.show() Simulating Accuracy Drop Demo We start with a standard SFT prompt format and create a few variations by making small changes—like removing newlines, tweaking punctuation, or rewording the instruction. We then measure how similar each version is using token overlap. The key insight is that even small formatting changes can significantly alter the token sequence. For example, removing newlines drops similarity to around 80%, showing that these aren’t just cosmetic—they’re signals the model relies on. The biggest impact comes from rewording the instruction, which cuts overlap to nearly 50%, meaning the prompt no longer resembles what the model was trained on, increasing the risk of unpredictable behavior. Copy CodeCopiedUse a different Browser def tokenize_prompt(text): return tokenizer.encode(text, add_special_tokens=False) # The canonical SFT (fine-tuning) template — what the model was trained on sft_template = ( “Below is a customer review. Classify the sentiment.nn” “Review: {review}nn” “Sentiment:” ) # Prompt variants — small changes, big token consequences variants = { “✓ SFT template (optimal)”: “Below is a customer review. Classify the sentiment.nnReview: {review}nnSentiment:”, “✗ Removed newlines”: “Below is a customer review. Classify the

What is Tokenization Drift and How to Fix It? Lire l’article »

AI, Committee, Actualités, Uncategorized

Sakana AI Introduces KAME: A Tandem Speech-to-Speech Architecture That Injects LLM Knowledge in Real Time

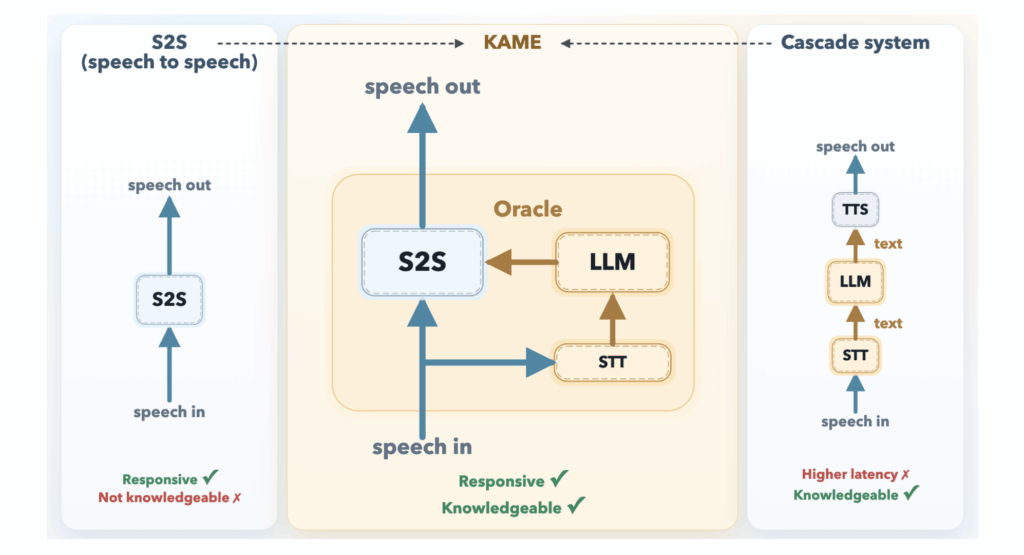
The fundamental tension in conversational AI has always been a binary choice: respond fast or respond smart. Real-time speech-to-speech (S2S) models — the kind that power natural-feeling voice assistants — start talking almost instantly, but their answers tend to be shallow. Cascaded systems that route speech through a large language model (LLM) are far more knowledgeable, but the pipeline delay is long enough to make conversation feel stilted and robotic. Researchers at Sakana AI, the Tokyo-based AI lab introduces KAME (Knowledge-Access Model Extension), a hybrid architecture that keeps the near-zero response latency of a direct S2S system while injecting the richer knowledge of a back-end LLM in real time. The Problem: Two Paradigms, Two Tradeoffs To understand why KAME is important, it helps to understand the two dominant designs it bridges. A direct S2S model like Moshi (developed by KyutAI) is a monolithic transformer that takes in audio tokens and produces audio tokens in a continuous loop. Because it doesn’t need to synchronize with external systems, its response latency is exceptionally low — for many queries, the model starts speaking before the user even finishes their question. But because acoustic signals are far information-denser than text, the model has to spend significant capacity modeling paralinguistic features like tone, emotion, and rhythm. That leaves less room for factual knowledge and deep reasoning. A cascaded system, by contrast, routes the user’s speech through an Automatic Speech Recognition (ASR) model, feeds the resulting text into a powerful LLM, and then converts the LLM’s response back into speech via a Text-to-Speech (TTS) engine. The knowledge quality is excellent — you can plug in any frontier LLM — but the system must wait for the user to finish speaking before ASR and LLM processing can even begin. The result is a median latency of around 2.1 seconds, which is long enough to noticeably interrupt natural conversational flow. https://pub.sakana.ai/kame/ KAME’s Architecture: Speaking While Thinking KAME operates as a tandem system with two asynchronous components running in parallel. The front-end S2S module is based on the Moshi architecture and processes audio in real time at the cycle of discrete audio tokens (approximately every 80 milliseconds). It begins generating a spoken response immediately. Internally, Moshi’s original three-stream design — input audio, inner monologue (text), and output audio — is extended in KAME with a fourth stream: the oracle stream. This is the key innovation point. The back-end LLM module consists of a streaming speech-to-text (STT) component paired with a full-scale LLM. As the user speaks, the STT component continuously builds a partial transcript and periodically sends it to the back-end LLM. For each partial transcript it receives, the LLM generates a candidate text response — called an oracle — and streams it back to the front-end. Because the user’s speech is still arriving, these oracles start as educated guesses and become progressively more accurate as the transcript grows more complete. The front-end S2S transformer then conditions its ongoing speech output on both its own internal context and these incoming oracle tokens. When a new, better oracle arrives, the model can correct course — effectively updating its response mid-sentence, the way a human might. Because both modules run asynchronously and independently, the initial response latency stays near zero. Training on Simulated Oracles One challenge is that no naturally occurring dataset contains oracle signals. Sakana AI research team addresses this with a technique called Simulated Oracle Augmentation. Using a ‘simulator’ LLM and a standard conversational dataset (user utterance + ground-truth response), the research team generates synthetic oracle sequences that mimic what a real-time LLM would produce across different levels of transcript completeness. They define six hint levels (0–5), ranging from a completely unguided guess at hint level 0 to the verbatim ground-truth response at hint level 5. The training data for KAME was built from 56,582 synthetic dialogues drawn from MMLU-Pro, GSM8K, and HSSBench, converted to audio via TTS and augmented with these progressive oracle sequences. Results: Near-Cascaded Quality, Near-Zero Latency Evaluations on a speech-synthesized subset of the MT-Bench multi-turn Q&A benchmark — specifically the reasoning, STEM, and humanities categories (Coding, Extraction, Math, Roleplay, and Writing were excluded as unsuitable for speech interaction) — show a dramatic improvement. Moshi alone scores 2.05 on average. KAME with gpt-4.1 as the back-end scores 6.43, and KAME with claude-opus-4-1 as the back-end scores 6.23 — both at essentially the same latency as Moshi. The leading cascaded system, Unmute (also backed by gpt-4.1), scores 7.70, but with a median latency of 2.1 seconds versus near-zero for KAME. To isolate back-end capability from timing effects, the research team also evaluated the back-end LLM’s text responses from the final oracle injection in each KAME session directly — bypassing the premature-generation problem entirely. Those scores averaged 7.79 (reasoning 6.48, STEM 8.34, humanities 8.56), comparable to Unmute’s 7.70. This confirms that KAME’s gap to cascaded systems is not a ceiling on the back-end LLM’s knowledge, but a consequence of starting to speak before the full user query has been heard. Crucially, KAME is fully back-end agnostic. The front-end was trained using gpt-4.1-nano as the primary back-end, but swapping in claude-opus-4-1 or gemini-2.5-flash at inference time requires no retraining. In Sakana AI’s experiments, claude-opus-4-1 tended to outperform gpt-4.1 on reasoning tasks, while gpt-4.1 scored higher on humanities questions — suggesting practitioners can route queries to the most task-appropriate LLM without touching the front-end model. Key Takeaways KAME bridges the speed-vs-knowledge tradeoff in conversational AI by running a front-end speech-to-speech model and a back-end LLM asynchronously in parallel — the S2S model responds immediately while the LLM continuously injects progressively refined ‘oracle’ signals in real time, shifting the paradigm from ‘think, then speak’ to ‘speak while thinking.’ The performance gains are substantial without any latency cost — KAME raises the MT-Bench score from 2.05 (Moshi baseline) to 6.43, approaching the cascaded system Unmute’s 7.70, while maintaining near-zero median response latency versus Unmute’s 2.1 seconds. The architecture is fully back-end agnostic — the front-end was trained using gpt-4.1-nano but supports

Sakana AI Introduces KAME: A Tandem Speech-to-Speech Architecture That Injects LLM Knowledge in Real Time Lire l’article »

AI, Committee, Actualités, Uncategorized

Musk v. Altman week 1: Elon Musk says he was duped, warns AI could kill us all, and admits that xAI distills OpenAI’s models

In the first week of the landmark trial between Elon Musk and OpenAI, Musk took the stand in a crisp black suit and tie and argued that OpenAI CEO Sam Altman and president Greg Brockman had deceived him into bankrolling the company. Along the way, he warned that AI could destroy us all and sat through revelations that he had poached OpenAI employees for his own companies. He even confessed, to some audible gasps in the courtroom, that his own AI company, xAI, which makes the chatbot Grok, uses OpenAI’s models to train its own.  The federal courthouse in Oakland, California, was packed with armies of lawyers carrying boxes of exhibits, journalists typing away at their laptops, and a handful of concerned OpenAI employees. Outside, protesters lined the streets, carrying signs urging people to quit ChatGPT, boycott Tesla, or both. Musk looked calm and comfortable, slipping in the occasional quip in his distinct South African accent. But he also was full of remorse.  “I was a fool who provided them free funding to create a startup,” Musk told the jury. He said when he cofounded OpenAI in 2015 with Altman and Brockman, he was donating to a nonprofit developing AI for the benefit of humanity, not to make the executives rich. “I gave them $38 million of essentially free funding, which they then used to create what would become an $800 billion company,” he said. Musk is asking the court to remove Altman and Brockman from their roles and to unwind the restructuring that allowed OpenAI to operate a for-profit subsidiary. The outcome of the trial could upend OpenAI’s race toward an IPO at a valuation approaching $1 trillion. Meanwhile, xAI is expected to go public as a part of Musk’s rocket company SpaceX as early as June, at a target valuation of $1.75 trillion. This week’s testimony revolved around a central question of the trial: why Musk is suing OpenAI. Musk argued he was trying to save OpenAI’s mission to develop AI safely by restoring the company to its original nonprofit structure. OpenAI’s lawyer, William Savitt, who once represented Musk and his electric-car company Tesla, countered that Musk was “never committed to OpenAI being a nonprofit” and instead was suing to undermine his competitor.  Who is the steward of AI safety? During his direct examination early in the week, Musk painted himself as a longtime advocate of AI safety. He said he cofounded OpenAI to create a “counterbalance to Google,” which was leading the AI race at the time. He said that when he asked Google cofounder Larry Page what happens if AI tries to wipe out humanity, Page told him, “That will be fine as long as artificial intelligence survives.”  “The worst-case scenario is a Terminator situation where AI kills us all,” Musk later told the jury. Savitt stood at the lectern and argued that Musk was not a “paladin of safety and regulation.” As he cross-examined Musk in his sharp, surgical cadence, Savitt pointed out that xAI sued the state of Colorado in April over an AI law designed to prevent algorithmic discrimination.  Musk’s lawyer, Steven Molo, sprang to his feet to object. He asked the judge if he, too, could weigh in on ChatGPT’s safety record.  The lawyers then entered a heated debate about who was the true guardian of AI safety.  The sparring continued the next morning. “We all could die as a result of artificial intelligence!” said Molo, suggesting that OpenAI could not be trusted to build AI safely. “Despite these risks, your client is creating a company that’s in the exact space,” Judge Yvonne Gonzalez Rogers said sternly, referring to xAI. “I suspect there’s plenty of people who don’t want to put the future of humanity in Mr. Musk’s hands.” When the lawyers began talking over each other, the judge snapped. “This is not a trial on whether or not artificial intelligence has damaged humanity,” she said.  When did Musk think he was being duped? As Savitt continued to cross-examine Musk, he pressed on the idea that Musk had never been committed to keeping OpenAI a nonprofit. He also claimed that Musk waited too long to sue OpenAI, filing after the statute of limitations ran out.  Musk explained why he sued in 2024 rather than earlier, describing “three phases” in his views of OpenAI. In phase one, he was “enthusiastically supportive” of the company.” In phase two, “I started to lose confidence that they were telling me the truth,” he said. In phase three, “I’m sure they’re looting the nonprofit.”  In 2017, Musk and other OpenAI cofounders discussed creating a for-profit subsidiary to raise enough capital to build artificial general intelligence—powerful AI that can compete with humans on most cognitive tasks. Musk wanted a majority interest in the subsidiary and the right to choose a majority of the board members. He also pitched having Tesla acquire OpenAI. (He left OpenAI in 2018.) “I was not opposed to there being a small for-profit that provides funding to the nonprofit,” he told the jury, “as long as the tail didn’t wag the dog.”  But it was only in late 2022, Musk testified, that he “lost trust in Altman” and his commitment to keeping the company a nonprofit. The key moment came, he said, when he learned that Microsoft would invest $10 billion in OpenAI.  “I texted Sam Altman, ‘What the hell is going on? This is a bait and switch,’” he told the jury. Microsoft would give $10 billion only if it expected “a very big financial return,” he said. Is Musk just trying to kill competition? But Savitt argued that Musk was really suing to undermine OpenAI as a competitor to his empire of tech companies. While he was on the board of OpenAI, Musk was also running Tesla and his brain-implant company, Neuralink. He founded xAI in 2023. Savitt pulled up an email that Musk had sent to a Tesla vice president in 2017 after hiring Andrej Karpathy, a founding member of OpenAI,

Musk v. Altman week 1: Elon Musk says he was duped, warns AI could kill us all, and admits that xAI distills OpenAI’s models Lire l’article »

AI, Committee, Actualités, Uncategorized

A Coding Implementation of End-to-End Brain Decoding from MEG Signals Using NeuralSet and Deep Learning for Predicting Linguistic Features

In this tutorial, we explore how we can decode linguistic features directly from brain signals using a modern neuroAI pipeline. We work with MEG data and build an end-to-end system that transforms raw neural activity into meaningful predictions, in this case, estimating word length from brain responses. We set up the environment, load and process neural events, design a custom feature extractor, and construct a structured data pipeline using NeuralSet. From there, we train a convolutional neural network to learn patterns in the temporal and spatial structure of MEG signals. Throughout the process, we focus on building a clean, modular workflow that mirrors real-world neuroAI research practices. Copy CodeCopiedUse a different Browser import subprocess, sys, importlib, pkgutil def pip_install(*pkgs): print(f”pip install {‘ ‘.join(pkgs)} …”) r = subprocess.run([sys.executable, “-m”, “pip”, “install”, “-q”, *pkgs], capture_output=True, text=True) if r.returncode != 0: print(“pip STDOUT:”, r.stdout[-2000:]) print(“pip STDERR:”, r.stderr[-2000:]) raise RuntimeError(“pip install failed; see output above.”) print(” ok”) pip_install(“numpy>=2.0,<2.3”) pip_install(“neuralset”) pip_install(“neuralfetch”) import numpy as np from numpy._core.umath import _center print(f”numpy {np.__version__} OK”) import warnings, typing as tp warnings.filterwarnings(“ignore”) import pandas as pd import torch import torch.nn as nn import torch.nn.functional as F from torch.utils.data import DataLoader import matplotlib.pyplot as plt import neuralset as ns from neuralset import extractors as ext_mod We install and validate all required dependencies, ensuring critical packages such as NumPy and NeuralSet are properly configured. We perform a quick NumPy check to avoid runtime issues later in the pipeline. We then import all core libraries needed for data processing, modeling, and visualization. Copy CodeCopiedUse a different Browser def deep_import(pkg_name: str): try: pkg = importlib.import_module(pkg_name) except Exception as e: print(f” could not import {pkg_name}: {e}”) return if not hasattr(pkg, “__path__”): return for m in pkgutil.walk_packages(pkg.__path__, prefix=pkg_name + “.”): try: importlib.import_module(m.name) except Exception: pass deep_import(“neuralfetch”) deep_import(“neuralset”) torch.manual_seed(0); np.random.seed(0) catalog = ns.Study.catalog() print(f”n{len(catalog)} studies registered.”) preferred = [“Fake2025Meg”, “Test2025Meg”, “Test2023Meg”] study_name = next((n for n in preferred if n in catalog), None) if study_name is None: meg_studies = [n for n, c in catalog.items() if “Meg” in c.neuro_types()] study_name = meg_studies[0] if meg_studies else None if study_name is None: raise RuntimeError( “No MEG study available. Catalog: ” f”{sorted(catalog.keys())[:20]}… ” “Install neuralfetch correctly (pip install neuralfetch) and re-run.” ) print(f”→ Using study: {study_name}”) We dynamically import all submodules from NeuralFetch and NeuralSet to ensure that all available studies are properly registered. We seed the random number generator for reproducibility and inspect the study catalog to identify available MEG datasets. We then select an appropriate study to use as the foundation for our pipeline. Copy CodeCopiedUse a different Browser class CharCount(ext_mod.BaseStatic): event_types: tp.Literal[“Word”] = “Word” def get_static(self, event) -> torch.Tensor: return torch.tensor([float(len(event.text))], dtype=torch.float32) print(“nBuilding chain…”) chain = ns.Chain(steps=[ {“name”: study_name, “path”: str(ns.CACHE_FOLDER)}, {“name”: “QueryEvents”, “query”: “type in [‘Word’, ‘Meg’]”}, ]) events = chain.run() print(f” → {len(events)} events; types={sorted(events.type.unique().tolist())}”) print(f” → Words: {(events.type==’Word’).sum()} | ” f”timelines: {events.timeline.nunique()}”) print(“nSample words:”) print(events[events.type==’Word’][[“start”,”duration”,”text”,”timeline”]] .head(5).to_string(index=False)) print(“nBuilding segmenter…”) segmenter = ns.dataloader.Segmenter( extractors={ “meg”: {“name”: “MegExtractor”, “frequency”: 100.0}, “char_count”: CharCount(aggregation=”trigger”), }, trigger_query=”type == ‘Word'”, start=-0.2, duration=0.8, drop_incomplete=True, ) dataset = segmenter.apply(events) print(f” → SegmentDataset: {len(dataset)} segments”) s0 = dataset[0] print(f”nSingle item:n meg : {tuple(s0.data[‘meg’].shape)}”) print(f” char_count : {s0.data[‘char_count’].item()} ” f”(word: {s0.segments[0].trigger.text!r})”) We define a custom extractor that computes the character count of each word event, enabling us to create a supervised learning target. We build a processing chain to load and filter relevant events from the selected study. We then segment the MEG signals around word events and construct a dataset ready for modeling. Copy CodeCopiedUse a different Browser rng = np.random.RandomState(42) perm = rng.permutation(len(dataset)) n_tr, n_va = int(0.70*len(dataset)), int(0.15*len(dataset)) train_ds = dataset.select(perm[:n_tr]) val_ds = dataset.select(perm[n_tr:n_tr+n_va]) test_ds = dataset.select(perm[n_tr+n_va:]) print(f”nSplit | train={len(train_ds)} val={len(val_ds)} test={len(test_ds)}”) mk = lambda d, sh: DataLoader(d, batch_size=32, shuffle=sh, collate_fn=d.collate_fn, drop_last=False) train_loader, val_loader, test_loader = mk(train_ds, True), mk(val_ds, False), mk(test_ds, False) probe = next(iter(train_loader)) n_ch, n_t = probe.data[“meg”].shape[-2:] print(f” → batch[meg] shape: {tuple(probe.data[‘meg’].shape)}”) print(f” → batch[char] shape: {tuple(probe.data[‘char_count’].shape)}”) class MEGDecoder(nn.Module): def __init__(self, n_channels: int, mid: int = 64): super().__init__() self.spatial = nn.Conv1d(n_channels, mid, 1) self.bn0 = nn.BatchNorm1d(mid) self.temporal1 = nn.Conv1d(mid, mid, 7, padding=3) self.bn1 = nn.BatchNorm1d(mid) self.temporal2 = nn.Conv1d(mid, mid//2, 7, padding=3) self.bn2 = nn.BatchNorm1d(mid//2) self.pool = nn.AdaptiveAvgPool1d(1) self.head = nn.Linear(mid//2, 1) self.drop = nn.Dropout(0.3) def forward(self, x): x = F.gelu(self.bn0(self.spatial(x))) x = F.gelu(self.bn1(self.temporal1(x))) x = self.drop(x) x = F.gelu(self.bn2(self.temporal2(x))) return self.head(self.pool(x).squeeze(-1)).squeeze(-1) device = torch.device(“cuda” if torch.cuda.is_available() else “cpu”) model = MEGDecoder(n_channels=n_ch).to(device) print(f”nDevice: {device} | params: {sum(p.numel() for p in model.parameters()):,}”) train_targets = torch.cat([b.data[“char_count”].squeeze(-1) for b in train_loader]) y_mean, y_std = train_targets.mean().item(), train_targets.std().item() + 1e-6 print(f”Target μ={y_mean:.2f} σ={y_std:.2f}”) def prep(batch): x = batch.data[“meg”].to(device).float() y = batch.data[“char_count”].squeeze(-1).to(device).float() x = (x – x.mean(-1, keepdim=True)) / (x.std(-1, keepdim=True) + 1e-6) y = (y – y_mean) / y_std return x, y We split the dataset into training, validation, and test sets to ensure proper model evaluation. We create data loaders and inspect batch shapes to confirm correct data formatting. We then define a convolutional neural network and prepare normalized inputs and targets for stable training. Copy CodeCopiedUse a different Browser EPOCHS = 15 opt = torch.optim.AdamW(model.parameters(), lr=1e-3, weight_decay=1e-4) sched = torch.optim.lr_scheduler.CosineAnnealingLR(opt, T_max=EPOCHS) loss_fn = nn.MSELoss() hist = {“tr”: [], “va”: [], “r”: []} def pearson(a, b): a, b = a – a.mean(), b – b.mean() return (a*b).sum() / (a.norm()*b.norm() + 1e-8) print(“n” + “=”*64) print(f”{‘Epoch’:>5} | {‘train’:>9} | {‘val’:>9} | {‘val_r’:>7}”) print(“=”*64) for ep in range(EPOCHS): model.train(); tr = [] for batch in train_loader: x, y = prep(batch) loss = loss_fn(model(x), y) opt.zero_grad(); loss.backward() torch.nn.utils.clip_grad_norm_(model.parameters(), 1.0) opt.step(); tr.append(loss.item()) sched.step() model.eval(); va, P, T = [], [], [] with torch.no_grad(): for batch in val_loader: x, y = prep(batch); p = model(x) va.append(loss_fn(p, y).item()); P.append(p.cpu()); T.append(y.cpu()) P, T = torch.cat(P), torch.cat(T) r = pearson(P, T).item() hist[“tr”].append(np.mean(tr)); hist[“va”].append(np.mean(va)); hist[“r”].append(r) print(f”{ep+1:>5d} | {np.mean(tr):>9.4f} | {np.mean(va):>9.4f} | {r:>+7.3f}”) model.eval(); P, T = [], [] with torch.no_grad(): for batch in test_loader: x, y = prep(batch) P.append(model(x).cpu()); T.append(y.cpu()) P, T = torch.cat(P), torch.cat(T) test_r = pearson(P, T).item() test_mse = ((P – T) ** 2).mean().item() print(f”nTEST | Pearson r = {test_r:+.3f} MSE = {test_mse:.3f}”) print(f”(Synthetic-MEG signals are random by design — small/zero r is expected.)”) fig, ax = plt.subplots(1, 3, figsize=(15, 4))

A Coding Implementation of End-to-End Brain Decoding from MEG Signals Using NeuralSet and Deep Learning for Predicting Linguistic Features Lire l’article »

We use cookies to improve your experience and performance on our website. You can learn more at Politique de confidentialité and manage your privacy settings by clicking Settings.

Privacy Preferences

You can choose your cookie settings by turning on/off each type of cookie as you wish, except for essential cookies.

Allow All
Manage Consent Preferences
  • Always Active

Save
fr_FR